|
HOME - ABOUT US - OUR PRINCIPAL - CONTACT US - TECH. RATES - EQUIP. RATES - FEE SCHEDULE - LINKS |
||||
|
|
||||
|
VIDEO LIGHTING: |
||||
|
Why you need a UNIQUE ENGINEERED SOLUTION. Are you interested in a Live or Recorded Webcast? CLICK HERE. What you need to know about HOME THEATER. UES CLASSES and Certifications. Glossary of AUDIO TERMS. Glossary of STAGE TERMS. Do you have a web camera at home? Here's some LIGHTING TIPS. Read about a few PRODUCTS we are developing. (This page still unpublished.) LINKS to a few Manufacturer of Multimedia Equipment websites. A few trade publications ONLINE.
|
Lighting for videography and theatrical works are very different yet
very similar. Theatrical lighting is generally intended to be more
dramatic whereas lighting for videography is more utilitarian.
Regardless of your needs, UES can assist you in planning and
implementing the correct lighting scheme you need. There are HUGE
energy savings to be had for a lighting system designed properly. The following information is intended to help introduce you to basics of lighting for use in videography.
Enough Light?
If you are racing around with an ENG camera, your only hope is
to place your subject under some existing light and maybe enhance the
brightness a little with the onboard camera light. It is surprising how
much brightness you get from a 25 watt onboard light when your
illuminating a newsperson only 5 feet away. This type of light isn't
beautiful, but at least it makes a picture. No problem --- In the case of the desk lamp, just insert a low wattage bulb to tone down the brightness. Gel the bulb to the right color temperature (explained later) if necessary. If the sky is too bright in your outdoor scene, either tilt your camera down to reduce the percentage of sky in the shot, or employ a graduated filter on your lens to darken the top part of the picture. As for the sun to your talent's back, set up a few reflectors to bounce the light into the talent's face. Now the sunlight becomes a back light (explained shortly) adding dimension to the scene. This shot, in fact, is often preferred over the sun-in-the-face shot because the uncontrolled sun tends to make the talent squint; the more controlled reflected light can be positioned to yield desired shadows without the squints. Me and my shadow If you have only one light (1-point lighting), place it to one side and above the camera aiming at the subject. If the light is too close to the camera, your subject will appear featureless (no shadows). If the light gets too low, the subject will look spooky or ominous. Campfires and candlelight are the only illumination that normally come from below. We are accustomed to light coming from above, from ceilings and the sun. Light from above and to the side of the camera will create a shadow under the chin and along one side of a face, giving it dimension.
One light alone does not do a great job. It is often so harsh that it creates super black shadows which exceed the contrast capability of the camera. You may diminish these shadows by bouncing your light off a white surface such as a wall or ceiling behind and above you, or by using a light with a large reflector, or one covered with specular (dimpled) glass, or with a fine screen called a scrim, or a white fiberglass sheet. All of these will weaken the light and soften the shadows. On faces, soft shadows are more flattering than hard shadows. Two-point lighting adds much more flexibility and I feel it is the minimum number of lights that you need to do a creditable lighting job. The first light, called the key light, creates the basic illumination for the scene; you might think of it as the sun. Place the lamp to one side of the camera and above it. How far you place the light from the camera is a matter of taste. The farther you move the light from the camera, the more pronounced the shadows will be, making your subject more dimensional, but you don't want to overdo it. You might place the lamp at an angle of 20 degrees to 45 degrees to one side and 30 degrees to 45 degrees above the subject. (When working with a single light, you keep it closer to the camera to downplay the shadows. When you have two lights, the second light takes over the job of downplaying the shadows.) A naked key light may be too harsh for video portraiture: every zit and wrinkle will show. Soften it with a scrim.
The second light, the fill light fills in the shadows you just made. This light is generally placed 20 degrees to 45 degrees to the side and 30 degrees to 45 degrees above the camera-to-subject-axis just like the key light but on the opposite side of the camera from the key light. The fill light is generally softer, not making strong shadows of its own, but mitigating the shadows made by the key light. The fill light generally has a larger reflector and scrim to weaken the light and soften its effect. The fill light shouldn't be as strong as the key light; you don't want to erase the shadows, just diminish them to the point where they add subtle dimensionality. The fill light may be half the wattage of the key light or be placed farther from the subject, weakening the light, or be gelled or scrimmed to weaken the light. The fill light may often be dimmed up to 20% without ruining your color temperature (a subject we'll discuss later). Three-point lighting adds a third light, a back or modeling light that sets the subject off from its background. The backlight, which is a hard, focused light, positioned 45 degrees to 75 degrees up from horizontal behind the subject, places a rim of brightness around heads and shoulders. Position the light far enough out of the scene so that it doesn't shine into your camera lens. Make the light bright enough to do the job without being obvious. Even the experts don't trust their eyes when lighting, and view the camera's image through a TV monitor when adjusting the brightness of the lights. Although the process can be done with light meters and calculations, it is quick and easy to observe the TV screen and use common sense and your innate aesthetic prowess when adjusting lights. Be careful not to aim the light directly down on your talent. This would create a halo across the top of a person's head and illuminate their nose. As the person's head moved, their nose would dip into and out of the light blinking on and off like Rudolph, the White-Nosed Reindeer. Three-point lighting will get you through most situations. Most small studios and office shots don't have room for a backdrop to be placed far from the talent. This means the background gets illuminated by the spillage from the key and fill lights, and you cannot do much about it. In larger areas, the backdrop or set may be far enough from the talent to become dark. It is appropriate for the background to be darker than the foreground; after all, you want the foreground to be the center of attention. If the background becomes too dark, you need to add a fourth light (thus the term 4-point lighting) which is called the set light. This fixture can be positioned overhead or near the floor or anywhere out of sight of the camera, aimed at the set. If the set is small, nearly any light will do the job. If the background is a tall curtain that must be illuminated evenly, special fixtures with semi-parabolic reflectors are used. When aimed towards the set from above, the fixture will beam most of its light towards the bottom of the set which is farther away, and beam a smaller amount of light at the top of the set which is nearby. This keeps the nearby part of the set from becoming overly bright.
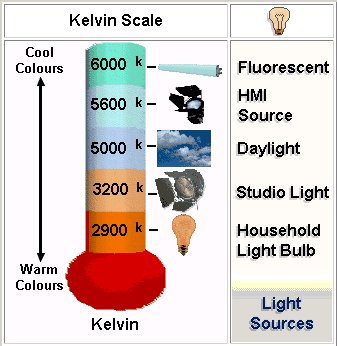
Color Temperature Thanks to physicist Max Planck, who first described this phenomenon and the patience of his local fire department, the subtle coloration of white light can be described by its color temperature. Incandescent light in a home, as well as outdoor light in the early morning or around sunset, is about 2000 degrees K. Early or late daylight or the light from professional quartz studio bulbs is about 3200 degrees K, slightly less red than home light bulbs. Mid-day light is about 5500 degrees K as is HMI (Halogen Metal Iodide) lights. This light is bluer and looks "colder" than 3200 degrees K studio lights. Daylight on a hazy or foggy day could be as high as 7000 degrees K. Fluorescent lamps may be around 3500 degrees to 6000 degrees K but have strong amounts of green and may be missing other colors entirely making them hard to describe on the color temperature scale. Professional fluorescent lamps are made which approximate a 3200 degree color temperature. When setting up your camera you can adjust your color temperature filters and white balance the camera for tungsten, halogen, fluorescent, or outdoor light and get a good image. A problem arises when you have two different colored lights in the same scene. If, for instance, you illuminated a face with a fluorescent light on one side and incandescent light from the other, the fluorescent cheek will look greenish-blue and the incandescent cheek would look reddish. By adjusting your camera you could make one side of the face look fine, but the other side would be ready for trick-or-treat. Dimming an incandescent light cools it and makes it redder (just like the physics experiment). You may get away with 10 to 20% dimming before the color shift becomes noticeable, but beyond that you create a color temperature problem, especially if the light coming from the opposite side of someone's face is running undimmed (the full 3200 degrees K). If you have to dim, say, your fill light more than 20%, it may be time to re-lamp the fill fixture with a lower wattage bulb or add a scrim or neutral density gel, then run the lamp undimmed. The color temperature of light can be changed by placing a colored filter, called a gel (short for gelatin, from which it is made) into the lighting fixture. Say you were shooting outdoors in 5500° K sunlight and were trying to fill in shadows on a face. If you aimed your trusty portable quartz light at the shadowy side of the face, that cheek would appear reddish. The problem can be solved by placing a blue filter in front of the quartz light changing its color temperature to 5,500 degrees K. Blue filters seriously reduce the amount of light that comes from a lamp, sometimes making it necessary to use more lights and more power. Once solution to this problem is to avoid electric lamps altogether and using a simple reflector, bounce the existing sunlight onto the dark side of the face. A white sheet or a white foam-core board would bounce a soft reflected light. The light may be so soft that the reflector will need to be near the subject. Placing wrinkled tin foil over the foam-core multiplies its reflectivity, allowing the reflector to be used from farther away from the talent. The foil reflector, however, would make a very focused beam that may be a little hard on your talent's eyes. For a more professional strategy, buy a commercially available fabric reflector. Several varieties are available and they are typically white on one side, gold or silver on the other. The fabric is stretched over a wire hoop to form the reflector. With a twist, the hoop collapses into an easier-to-transport figure eight. A third solution to the above dilemma: HMI lights.
HMI lights are color balanced to 5,400 degrees K and are perfect
companions for sunlight. Since they do not need filters to achieve the
5,500 degree temperature, all of the light gets used, wasting none going
through filters, and wasting no electric power. HMI lights have two disadvantages. First, they are more expensive than their 3200° K brothers. Second, the instruments don't plug directly into a wall outlet. Instead, they plug into a large and heavy ballast, a transformer which powers the light. The ballast plugs into the wall outlet.
Greasy Fingerprint The replacement bulb's glass should never be touched with your fingers. Small amounts of oil from your fingertips will de-crystallize the glass when it heats up, causing it to crack. Instead, transport the bulb by its packing, and slip it into its socket without touching the glass with your fingers. Once the fixture is re-lamped, you can plug it in and turn it on. Don't unplug or plug in fixtures while they are turned on. Lusty sparks will jump from the plugs as you make or break an active circuit. Turn off the studio dimmer for the light or throw the light switch before disconnecting it. If using extension cords, remember that lights use a lot of power. Check the temperature of your extension cords near their plugs from time to time; don't wait until you smell smoke. Also, don't turn all of your lights on at the same time; the power surge may trip your circuit breaker. Office and school electrical outlets are often good for 30 amps (3,600 watts) and older homes may be good for only half that much. Heavy duty extension cords are generally rated at 15 amps which translates to 1,800 watts of power. You'll be overworking your extension cord if you try to run two 1,000 watt lights from it.
|
|||